3D printers are something that we’ve enjoyed using in the studio since 2020. With their rise in popularity for manufacturing, as well as in households for hobbyists, the materials and capabilities continue to evolve. Over the years we’ve had opportunities to experiment with this technology to build custom components for our displays. Okay, and for fun personal projects (ask Dave about the Mandalorian helmet he is making for his kids…).
How The Technology Works
A 3D printer works by building up hundreds — even thousands — of thin layers of material to create a specific object. The first step in 3D printing is to model your object to scale using 3D software. Our team executes this using Solidworks or Rhino 3D. Once the 3D model is built, it gets exported as a .stl file extension. This stands for stereolithography: a series of connected triangles that map out the geometry of the object.
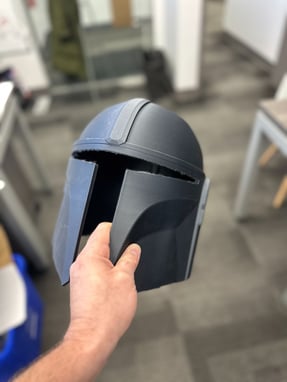
Initial 3D printing of a Star Wars-themed helmet
The next step is to upload the model into a 3D slicer software. This “slices” the model into multiple layers to map out directions for the printer. We do this in a program called UltiMaker Cura, which exports the file into a format called G-Code. Once this is complete, we’re ready to start printing!
The Print Process
The print process can take hours, days, or even weeks for some large-scale manufacturing. While this may seem slow, having the ability to create custom components without additional manufacturers or shipping can be a huge time and money saver.
When the project is in the printing stage, there is a wide variety of materials that can be used. Various types of plastic are some of the most common, but other materials include carbon fibre, metal, and even wood! Here at Exhibit Studio + Westwind Design, we use a couple of different printers and processes.


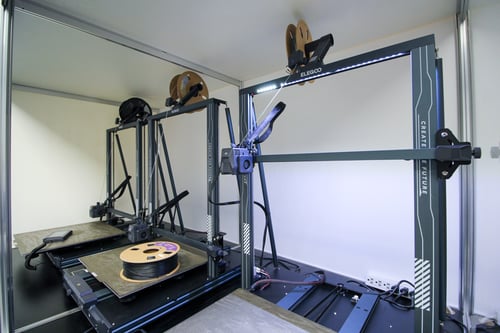
The first is an FDM printer, which stands for fused deposition modelling. This process uses heat to extrude the material, which is then bonded to the layers below. The material arrives as a thin filament wound onto a spool. During the printing process, this material gets heated and fed through a nozzle. Based on the G-Code instructions that the 3D slicing software created, the printer nozzle can move on an X, Y, and Z axis to create layers of material. A fan cools things down during the layer adhesion to solidify the object as it gets built up. We use this type of 3D printer and process for building functional display parts.
When using our FDM printer, these are the materials we work with:
- PLA: Polylactic acid, a bioplastic made from natural or recycled materials such as corn starch. One of the most popular materials for 3D printing
- TPU: Thermoplastic Polyurethane, a plastic material with elastic, bendable qualities
- PETG: Polyethylene terephthalate glycol, say that 5 times fast! A tough clear material with thermal resistance
- ABS: Acrylonitrile butadiene styrene, another tongue-twister that is impact-resistant
- Nylon: tough and somewhat flexible with anti-abrasion qualities
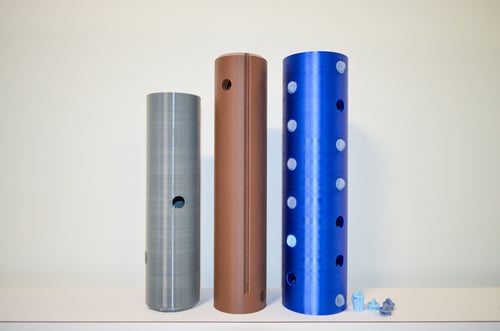
An SLA 3D-printed well model for a client's trade show display
The second type of printer we use is an SLA: which is another acronym for stereolithography. It uses resin, a more viscous material, and UV light to cure each layer. It doesn’t use heat and is better for small parts and printing multiple parts at a time. It’s great for light-duty functional applications and is used primarily for representation/scaled modelling.
How We’re Using 3D Printing In The Trade Show Industry
The 3D printers that we have at Exhibit Studio + Westwind Design can create objects that fit within an approximate 1-foot cubed space. We’re not manufacturing entire 10x20 displays here; although 3D printing can build big projects like cars or even houses! What it has proved to be extremely useful for is custom fabrication, and things that are almost impossible to build. This includes models that represent how our client's products work, unique lighting fixtures, connectors, and anything else that requires a truly unique solution that off-the-shelf items aren't able to accommodate.
 A 3D-printed model of various pipes and plugs for a client's trade show display
What 3D printing really allows us to do is have better options for custom components that we are able to design and control in-house. It doesn’t rely on external suppliers or shipping, which can help to stay on time with projects and also allows us to experiment with materials and designs. We’re able to create one-of-a-kind solutions for our clients without hefty price tags. If a display is discontinued and certain parts are not available anymore, we have the ability to make those parts and fixes.
We’re constantly learning new applications for this technology, that allow us to do what we do best: be creative and innovative!